
The fiddle leaf fig (Ficus lyrata) is a stunning indoor plant beloved for its large, glossy leaves and dramatic aesthetic. However, if you notice brown spots creeping onto its foliage, it can be frustrating and concerning. Brown spots can signal various issues, from watering mistakes to pest infestations. Understanding the cause is key to restoring your plant’s health.
In this guide, we’ll explore the most common reasons your fiddle leaf fig has brown spots and provide actionable solutions to keep your plant thriving.
I’ve provided detailed information in the article below to help with your concerns, However, if you still have questions or need more help, feel free to share photos of your plants or describe your issue on our Facebook Group. Just join the group and leave a comment on the most recent post — either I or someone from the community will respond as soon as possible. We also share helpful and unique plant care tips daily, so consider joining the group to stay updated!
Common Causes of Brown Spots on Fiddle Leaf Fig
1. Overwatering and Root Rot
Overwatering is one of the leading causes of brown spots on fiddle leaf figs. When the roots sit in excess moisture, they become susceptible to root rot, which damages the plant’s ability to absorb nutrients. Without proper drainage, the soil remains damp for too long, creating the perfect environment for fungal growth and decay.
Signs of Overwatering:
- Dark brown or black spots on the leaves, often starting from the base
- Mushy, rotten roots when examined
- A musty or foul odor from the soil
- Yellowing leaves along with brown spots
- Drooping leaves despite wet soil
How to Fix It:
- Check the soil before watering; insert your finger at least two inches deep. If it feels damp, wait a few days before watering again.
- Use a well-draining potting mix that contains peat, perlite, and sand to prevent excess moisture retention.
- Ensure the pot has drainage holes to allow excess water to escape.
- Repot the plant if root rot is severe. Trim off affected roots using sterilized scissors and replant in fresh, dry soil.
- Adjust your watering schedule—only water when necessary. Typically, watering once a week is sufficient, but this depends on your home’s humidity and temperature.
2. Underwatering and Dry Conditions
If your fiddle leaf fig is not getting enough water, it may develop brown spots due to dehydration. Dry conditions cause leaf edges to turn brown and crispy. When the plant lacks sufficient hydration, it struggles to transport nutrients and maintain cell structure, leading to leaf damage.
Signs of Underwatering:
- Light brown, dry spots on leaf edges that spread inward
- Drooping or curling leaves
- Soil that feels completely dry and pulls away from the pot’s edges
- Leaves that become brittle and easily crack
How to Fix It:
- Increase watering frequency, ensuring the soil stays slightly moist but not soggy. Water thoroughly until excess drains from the bottom of the pot.
- Use room-temperature water to avoid shocking the roots and prevent stress.
- Mist the leaves occasionally to provide humidity, especially in dry indoor environments.
- Check the weight of the pot before and after watering to gauge soil moisture levels.
3. Sunburn and Too Much Direct Light
Fiddle leaf figs love bright, indirect light, but direct sunlight can scorch their delicate leaves, causing brown spots. If the plant is exposed to harsh sunlight for extended periods, its leaves may suffer from photodamage, leading to cell breakdown and browning.
Signs of Sunburn:
- Light brown or bleached patches on the upper leaves
- Leaves that feel dry and brittle to the touch
- Sun-exposed leaves showing more damage than shaded ones
- Wrinkled or curled leaf edges
How to Fix It:
- Move your plant to a location with bright, indirect light. East or north-facing windows work best.
- Use sheer curtains to diffuse harsh sunlight and protect the leaves.
- Rotate the plant regularly to ensure even light exposure and prevent uneven growth.
- Gradually acclimate your plant to brighter conditions if it has been in low light, to avoid shock.
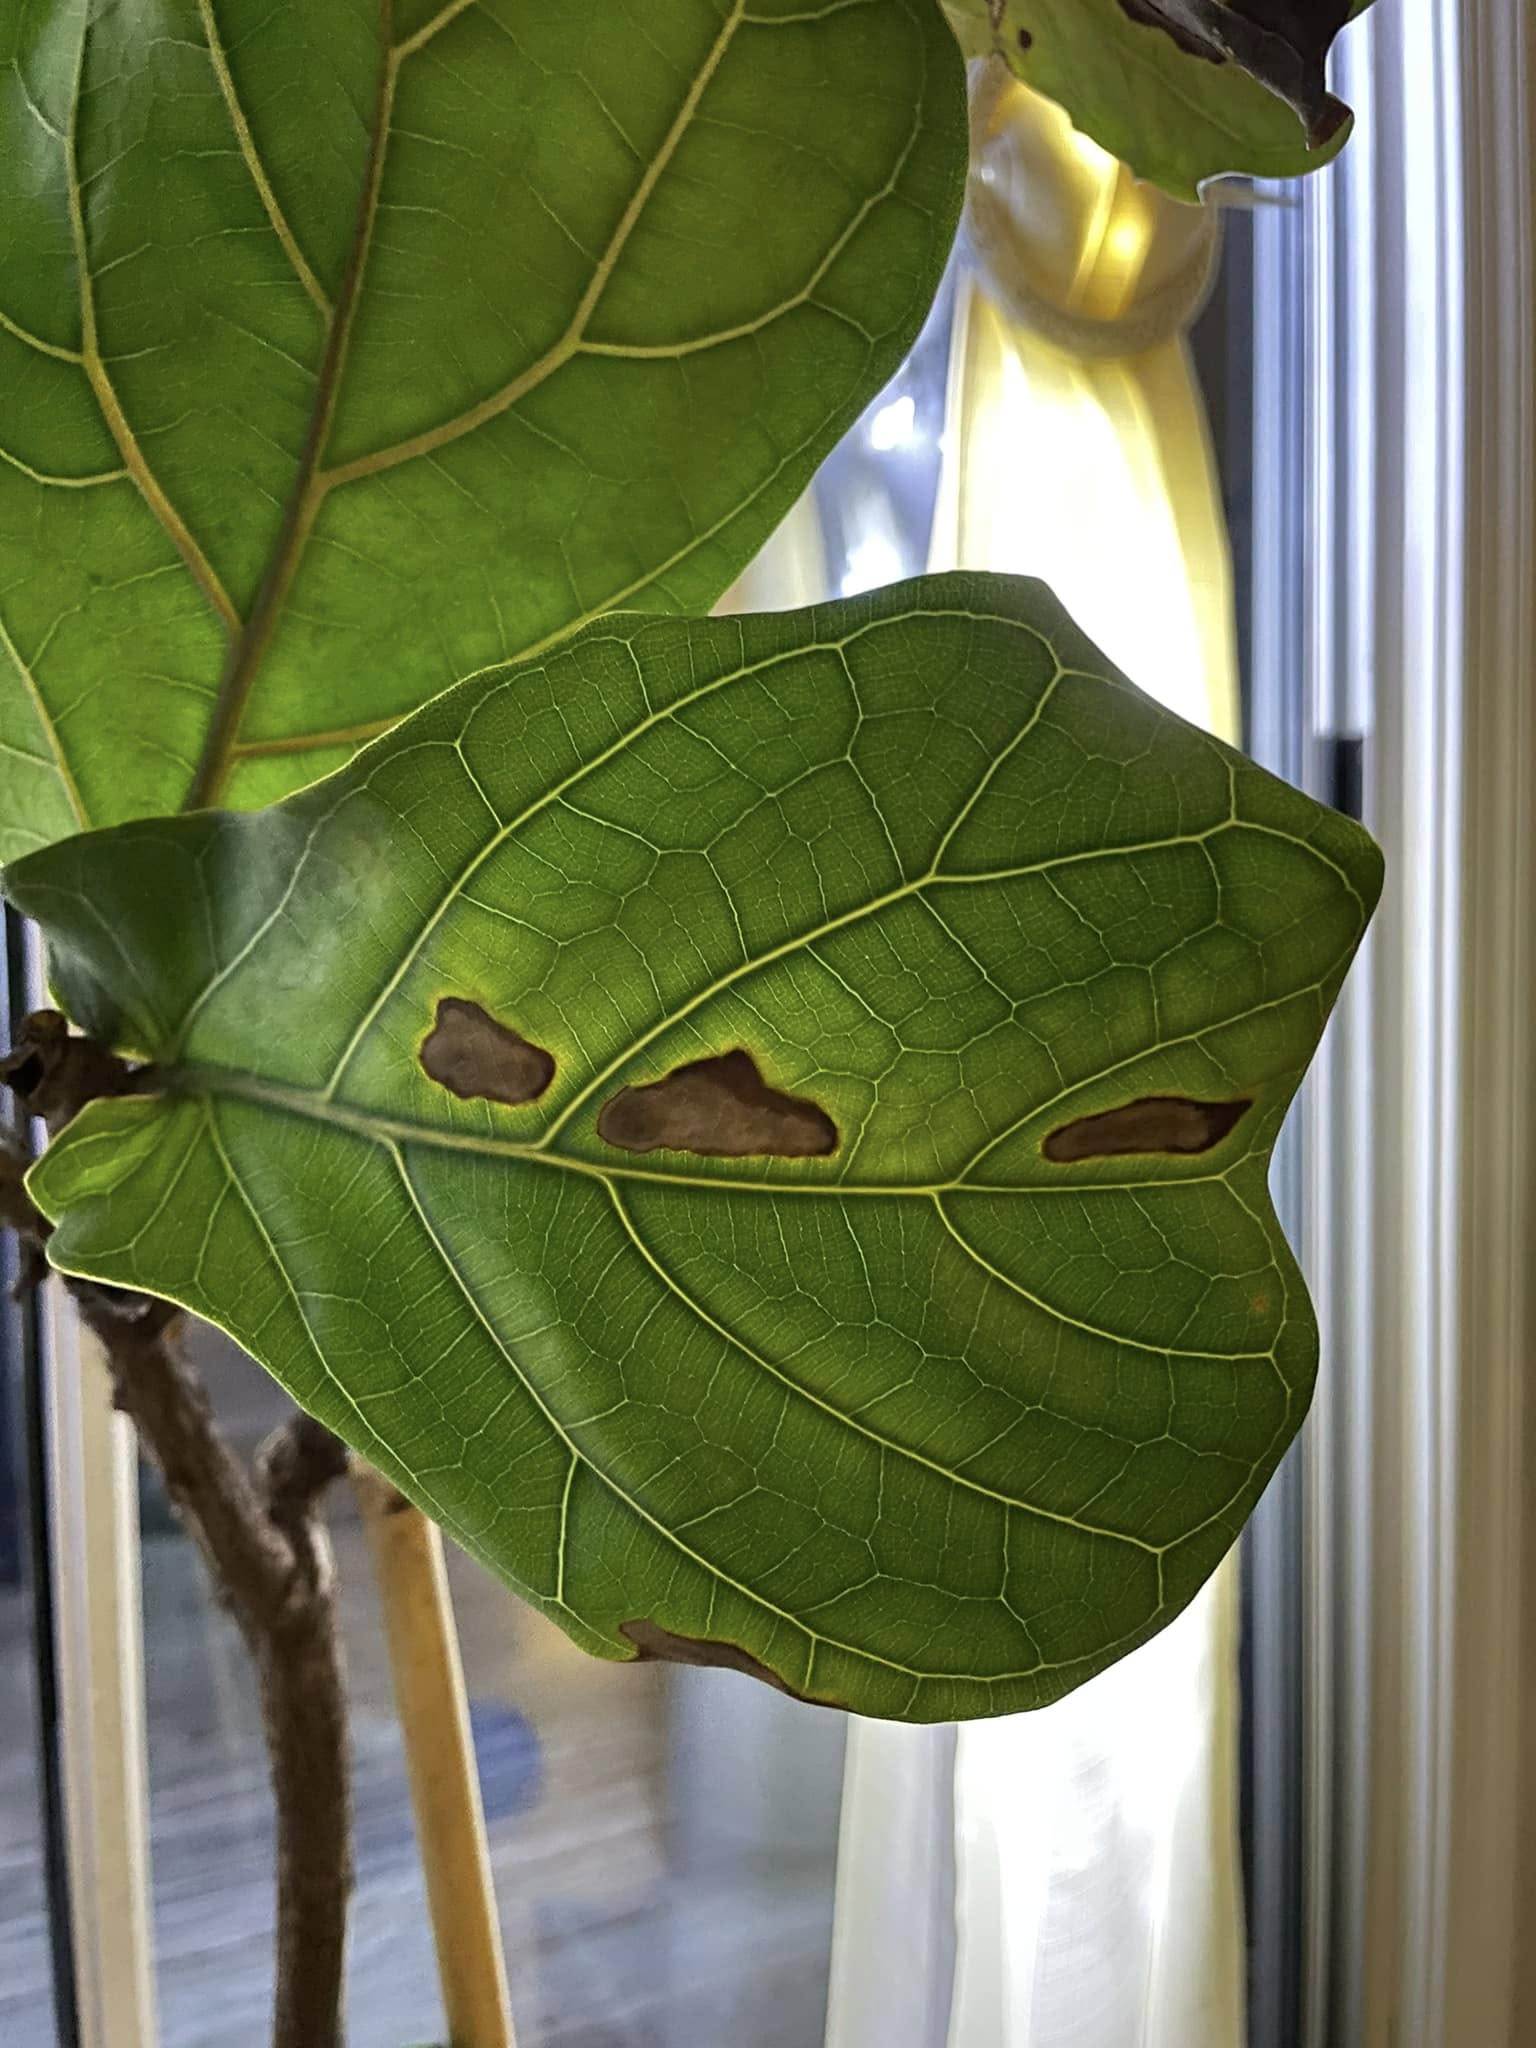
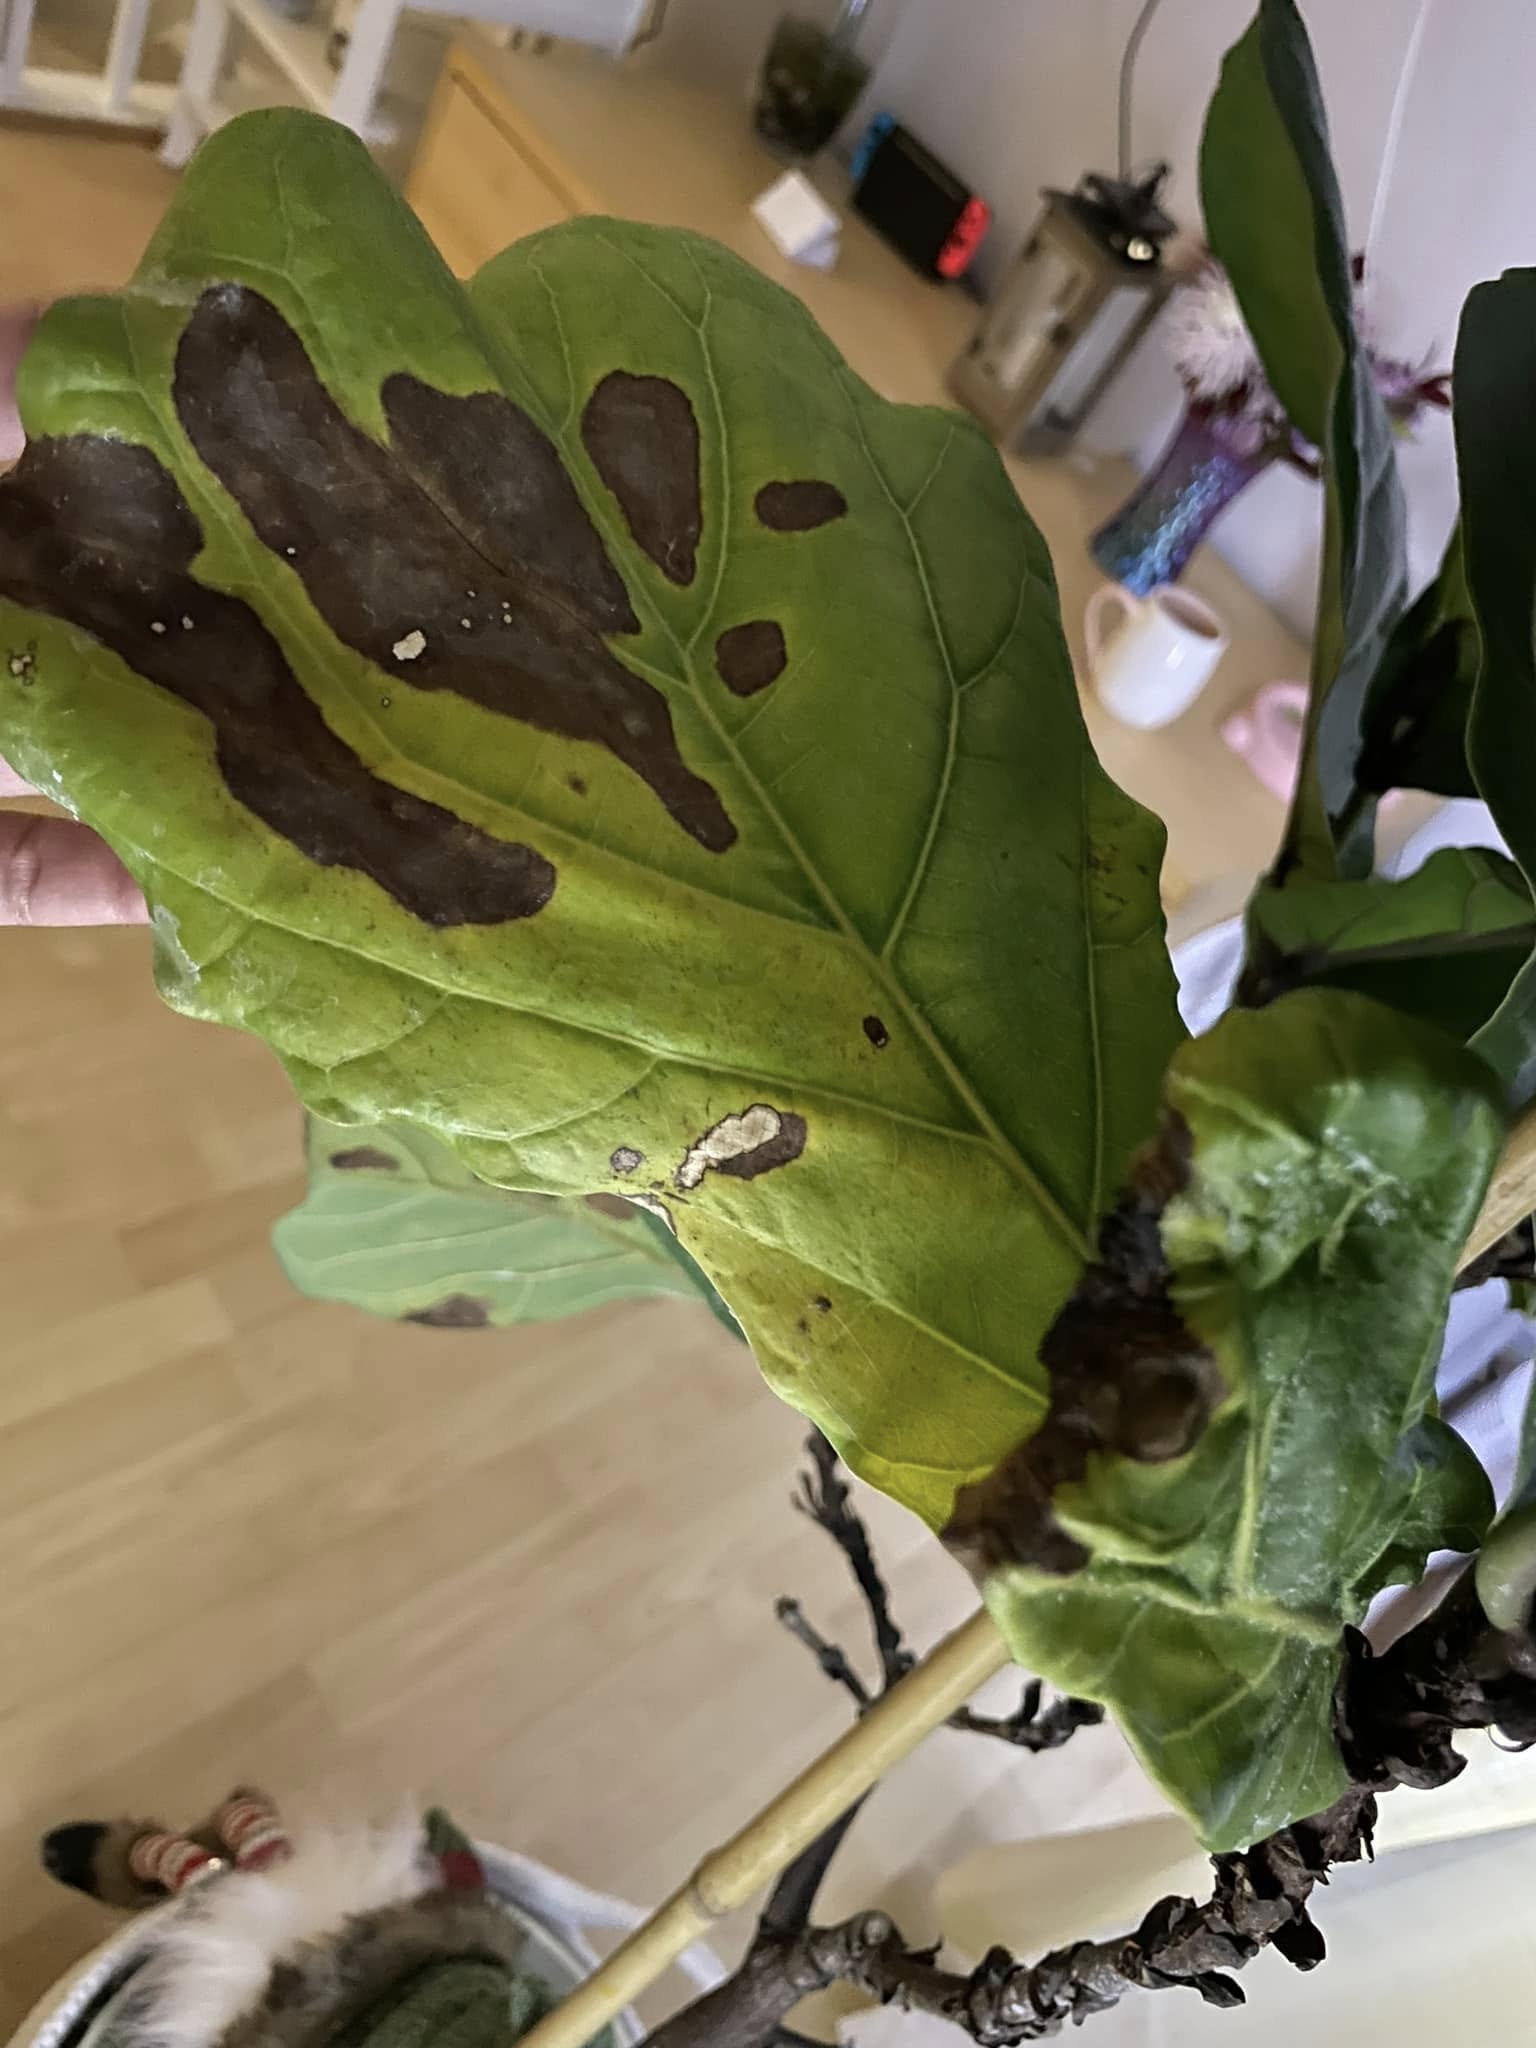
4. Fungal or Bacterial Infections
Brown spots can also result from fungal or bacterial infections, often caused by excess moisture and poor airflow. These infections spread quickly and can significantly damage the plant if not addressed promptly.
Signs of Infection:
- Small, dark brown spots that grow in size over time
- Yellow halos around the spots, indicating bacterial spread
- Leaves dropping prematurely, even if the soil is properly watered
- A sticky or slimy substance on the leaves (in bacterial infections)
How to Fix It:
- Remove affected leaves immediately to prevent the spread of infection.
- Improve air circulation by spacing out plants and using a fan if necessary.
- Avoid overhead watering to keep leaves dry and reduce the chances of fungal growth.
- Use a fungicide or antibacterial spray as a last resort if the infection persists.
- Ensure the plant is in a clean environment, wiping down leaves with a damp cloth regularly.
5. Pests and Infestations
Tiny invaders like spider mites, mealybugs, and scale insects can suck the sap from your fiddle leaf fig, causing stress and brown spots. These pests weaken the plant by draining essential nutrients, leading to leaf discoloration and damage.
Signs of Pest Infestation:
Tiny brown or yellow spots that multiply over time
Webbing on the undersides of leaves (a sign of spider mites)
Sticky residue on leaves (honeydew from pests, which can attract mold)
Visible bugs clustered along stems and leaf veins
How to Fix It:
Inspect your plant for pests regularly, especially under the leaves.
Wipe leaves with a damp cloth to remove bugs before they spread.
Use insecticidal soap or neem oil to treat infestations effectively.
Quarantine infected plants to prevent pests from spreading to other houseplants.
How to Prevent Brown Spots on Your Fiddle Leaf Fig
Prevention is always better than cure! Follow these simple tips to keep your fiddle leaf fig healthy and spot-free:
1. Water Wisely
- Stick to a consistent watering schedule based on soil dryness.
- Water deeply, allowing excess to drain out, but avoid letting the plant sit in water.
2. Provide Proper Light
- Keep your plant in bright, indirect light for optimal growth.
- Avoid prolonged exposure to harsh direct sunlight, which can scorch the leaves.
3. Maintain Humidity Levels
- Use a humidifier if your home has dry air, especially in winter.
- Mist the leaves occasionally to provide additional moisture.
4. Clean and Inspect Leaves
- Wipe down leaves to remove dust and pests, ensuring they can photosynthesize properly.
- Check for signs of disease or infestations regularly to catch issues early.
5. Fertilize Correctly
- Use a balanced liquid fertilizer every 4–6 weeks during the growing season.
- Avoid over-fertilizing, as excess nutrients can lead to salt buildup and plant stress.