
Dreaming of lush, trailing vines without the hassle? English Ivy (Hedera helix) is one of the easiest plants to propagate, making it a favorite among beginners and seasoned plant lovers alike. Whether you want to expand your indoor jungle or add greenery to your garden, propagating English Ivy is a simple and rewarding process. Even if you don’t consider yourself a plant expert, this guide will show you how to do it effortlessly!
By learning how to propagate English Ivy, you can enjoy the satisfaction of growing your own plants while also saving money. Instead of purchasing new plants, you can take cuttings from an existing plant and multiply them effortlessly. Plus, watching your plant grow from a tiny cutting into a thriving vine is incredibly rewarding. This guide will take you through the different methods, step by step, ensuring your propagation success.
I’ve provided detailed information in the article below to help with your concerns, However, if you still have questions or need more help, feel free to share photos of your plants or describe your issue on our Facebook Group. Just join the group and leave a comment on the most recent post — either I or someone from the community will respond as soon as possible. We also share helpful and unique plant care tips daily, so consider joining the group to stay updated!
Why Propagate English Ivy?
Before we dive into the step-by-step guide, let’s take a look at why propagating English Ivy is a great idea:
- Cost-effective: Instead of buying new plants, you can multiply your ivy collection for free. With just one healthy ivy plant, you can create an endless supply of new plants for your home or garden.
- Easy maintenance: English Ivy thrives with minimal care, making it perfect for busy individuals. Unlike finicky plants, it doesn’t require constant attention or special care.
- Air purification: This hardy plant is known for improving indoor air quality. Studies show that English Ivy can help filter toxins from the air, making your home a healthier place to live.
- Aesthetic appeal: Whether indoors or outdoors, its cascading vines add a touch of elegance. English Ivy looks beautiful draping from hanging baskets, climbing trellises, or even spreading as ground cover in your garden.
- Gifting opportunity: Propagating ivy also allows you to share plants with friends and family. A small ivy cutting in a decorative pot makes a thoughtful and eco-friendly gift!
Methods of Propagating English Ivy
There are three main ways to propagate English Ivy:
- Water Propagation – Simple and great for beginners, this method allows you to watch roots grow in real time before planting in soil.
- Soil Propagation – Ensures strong root development from the start and helps the plant transition smoothly to its new environment.
- Division Method – Ideal for mature, bushy plants that can be split into multiple new plants quickly and easily.
Each method has its own advantages, so choose the one that suits you best based on your experience and preference.
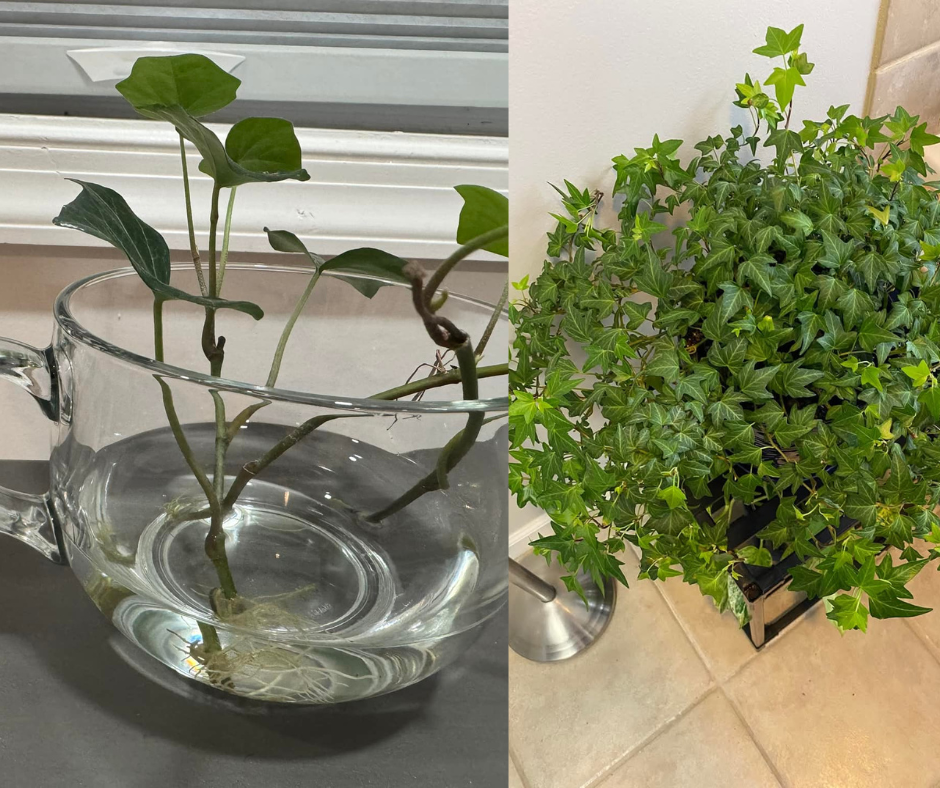
Method 1: Water Propagation – Watch the Roots Grow!
Water propagation is the easiest and most visually satisfying method. You’ll love seeing new roots emerge, making it an exciting process for plant lovers of all levels.
What You’ll Need:
- Healthy English Ivy cuttings (4-6 inches long)
- A clean glass or jar
- Room-temperature water
- Scissors or pruning shears
Step-by-Step Guide:
- Choose a healthy vine – Look for a strong, disease-free stem with at least 3-4 leaves. Avoid yellowing or damaged leaves, as they may indicate an unhealthy plant.
- Cut the stem – Using sharp scissors or pruning shears, cut just below a leaf node (the bump where leaves grow). Cutting at an angle can help the plant absorb more water and encourage faster root growth.
- Remove lower leaves – Strip off any leaves that will be submerged in water. This prevents rotting and keeps the water clean.
- Place in water – Put the cutting in a jar filled with room-temperature water. Ensure that only the stem is submerged, not the leaves.
- Find a bright spot – Place the jar in indirect sunlight, avoiding harsh direct rays. A well-lit windowsill is ideal.
- Change the water regularly – Refresh the water every 3-5 days to prevent bacterial growth and ensure a steady supply of oxygen for the roots.
- Wait for roots to grow – In about 2-4 weeks, you’ll see small roots forming. Once they’re about an inch long, you can transfer them to soil for long-term growth.
Method 2: Soil Propagation – A Head Start for Healthy Growth
If you prefer a more direct approach, soil propagation helps ivy establish itself faster in its permanent home. This method requires a bit more patience but results in strong and healthy plants.
What You’ll Need:
- A small pot with drainage holes
- Well-draining potting mix (a blend of peat moss, perlite, and compost is ideal)
- Healthy English Ivy cuttings
- Rooting hormone (optional but recommended for faster growth)
Step-by-Step Guide:
- Prepare the pot – Fill a small pot with moist, well-draining soil. Ensure the pot has drainage holes to prevent waterlogging.
- Take a cutting – Select a 4-6 inch vine and cut just below a leaf node using sharp scissors.
- Apply rooting hormone (optional) – Dip the cut end into rooting hormone to encourage faster root growth. While not required, it significantly increases success rates.
- Plant the cutting – Insert the cut end into the soil, burying the first node. This is where new roots will form.
- Water lightly – Keep the soil moist but not soggy. Overwatering can cause root rot, so ensure the soil is only slightly damp.
- Provide the right conditions – Place the pot in bright, indirect sunlight and keep it in a warm, humid environment.
- Monitor growth – In about 3-6 weeks, new growth should appear, indicating successful rooting. Once the plant is established, it can be repotted into a larger container or planted outdoors.
Method 3: Division – Best for Mature Ivy Plants
If you have a mature, bushy ivy plant, dividing it is an effective way to create new plants instantly. This method is ideal for ivy that has outgrown its container.
Step-by-Step Guide:
- Remove the plant from its pot – Gently loosen the soil and take out the ivy, shaking off excess dirt to expose the roots.
- Separate the roots – Using your hands or a knife, carefully divide the root ball into smaller sections, ensuring each section has both roots and foliage.
- Replant immediately – Place each section in a new pot with fresh, well-draining soil, pressing the soil around the roots to secure them.
- Water thoroughly – Give each new plant a deep watering and place them in indirect light as they adjust to their new environment.