
The Wandering Jew plant (Tradescantia) is a beautiful and resilient houseplant, loved for its vibrant purple and green foliage. However, if your once-thriving plant is looking dull, droopy, or struggling to survive, don’t worry! Even beginners can bring their Wandering Jew plant back to life with the right care and attention.
In this no-fail guide, we will walk you through the essential steps to revive your plant, identify common problems, and prevent future issues. Whether your plant is suffering from yellowing leaves, leggy growth, or root rot, we have solutions that will help. Ready to give your Wandering Jew a fresh start? Let’s dive in!
I’ve provided detailed information in the article below to help with your concerns, However, if you still have questions or need more help, feel free to share photos of your plants or describe your issue on our Facebook Group. Just join the group and leave a comment on the most recent post — either I or someone from the community will respond as soon as possible. We also share helpful and unique plant care tips daily, so consider joining the group to stay updated!
Why Is My Wandering Jew Dying?
If your Wandering Jew plant is looking weak or unhealthy, there are several possible reasons. Let’s explore the most common causes in detail:
1. Inadequate Lighting
- Too much direct sunlight: If your plant is exposed to intense, direct sunlight, the leaves may scorch and turn brown at the edges.
- Too little light: If the plant isn’t receiving enough light, it will start stretching toward the nearest source, leading to leggy growth and pale leaves.
- Solution: Place your plant in bright, indirect light, preferably near a window with filtered sunlight. If you don’t have enough natural light, a full-spectrum grow light can help.
2. Overwatering or Underwatering
- Overwatering: This is a major cause of plant death. Too much water leads to root rot, which prevents the plant from absorbing nutrients. Symptoms include yellowing leaves, mushy stems, and a foul odor from the soil.
- Underwatering: If the soil dries out completely, the leaves will become crisp, wilt, and drop off.
- Solution: Water when the top inch of soil is dry, but never let the plant sit in standing water. Use a well-draining potting mix and a pot with drainage holes to prevent waterlogging.
3. Poor Soil Drainage
- Using dense, compacted soil can suffocate the roots, leading to poor growth and root rot.
- Solution: Use a light, well-draining mix with peat moss, perlite, and compost to provide proper aeration and moisture retention.
4. Nutrient Deficiencies
- If your plant isn’t getting the nutrients it needs, growth will slow, and leaves may turn pale or yellow.
- Solution: Feed your Wandering Jew with a balanced liquid fertilizer (diluted to half strength) every 2-4 weeks during the growing season.
5. Pests and Diseases
- Common pests like spider mites, aphids, and mealybugs suck the plant’s nutrients, causing yellowing and curling leaves.
- Solution: Regularly inspect leaves and use neem oil or insecticidal soap to eliminate infestations.
6. Low Humidity
- The Wandering Jew thrives in moderate to high humidity. Dry indoor air can cause leaf tips to brown and crisp.
- Solution: Increase humidity by misting the leaves, placing a tray of water nearby, or using a humidifier.
Step-by-Step Guide to Reviving Your Wandering Jew Plant
Step 1: Assess the Damage
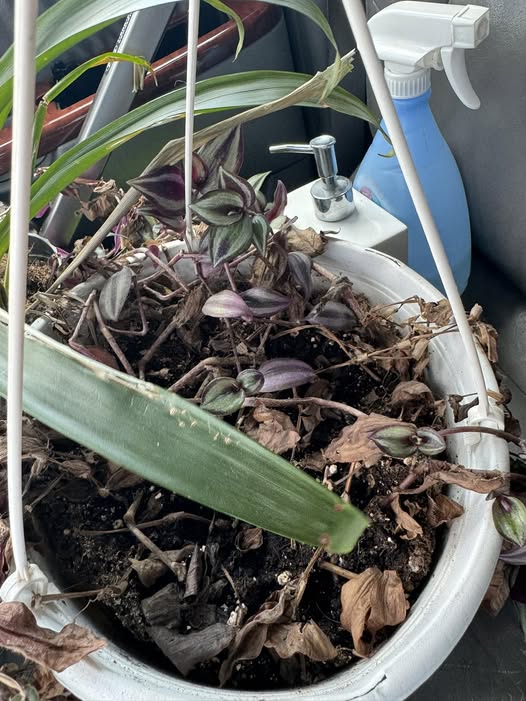
Start by examining your plant closely. Look for these key signs:
- Yellowing or wilting leaves – This often indicates overwatering, underwatering, or nutrient deficiencies.
- Mushy or dry stems – Soft stems suggest root rot, while overly dry stems mean dehydration.
- Stunted growth – A lack of new growth could mean poor lighting, insufficient nutrients, or compacted soil.
- Root rot (foul smell or blackened roots) – This is a major issue caused by excessive moisture and poor drainage.
Understanding the issue will help determine the right course of action.
Step 2: Trim Away Dead or Damaged Leaves
Use sharp, clean scissors or pruning shears to remove any:
- Brown, dry, or yellow leaves
- Mushy stems (a sign of rot)
- Overgrown or leggy sections
Why is pruning important?
- Prevents further decay from spreading to healthy parts
- Encourages new growth by redirecting energy to healthy stems
- Improves air circulation, reducing the risk of mold or pest infestations
After pruning, ensure that your plant is placed in an environment that supports its recovery.
Step 3: Adjust Watering Habits
Are you overwatering or underwatering? Here’s how to find the right balance:
- Check the soil: Stick your finger an inch into the soil. If it feels dry, it’s time to water. If it’s still moist, wait a few more days.
- Use the right amount of water: Water thoroughly but avoid letting the plant sit in stagnant water.
- Establish a schedule: Water about once a week, but adjust based on the season and humidity levels.
Pro tip:
Use a self-watering pot or a moisture meter to make watering easier and prevent overwatering mistakes